I figured baked oatmeal would be a disaster if I tried to make it portable. I assumed the edges would burn, the centers would stay raw, and I’d end up with a tray of mushy, unidentifiable breakfast sludge. It took about twenty minutes in the oven for that specific anxiety to completely dissolve into something much better. Honestly, I was wrong about the mush part, but right about the anxiety part—until the smell hit.
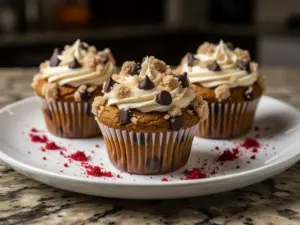
You know that specific scent of cinnamon and roasted pumpkin that seems to hug your kitchen? That’s what stopped me from turning the oven off early. I pulled the tray out expecting a flat, dense disk. Instead, I got these little golden mounds that held their shape perfectly. They were firm enough to grab on the way out the door but soft enough to eat with one hand while checking emails.
Let’s face it, morning routines are chaotic. We’re all just trying to get fuel into our systems before the day starts. I started making these because I needed something that wouldn’t require a fork and a plate. I wanted a breakfast that didn’t feel like a compromise between healthy and tasty. These pumpkin oatmeal cups are exactly that. They taste like pie but act like a proper meal.
I’ve made them for every occasion since that first batch. They’re sturdy, they reheat beautifully, and they don’t leave a trail of crumbs everywhere. That’s the kind of breakfast win I’m looking for. It’s not about fancy presentation; it’s about getting good food into your body without the stress.
The real surprise was how much they improved after sitting in the fridge for a day. The flavors melded together, becoming richer and more cohesive. I didn’t expect that. I thought they’d just dry out. Instead, they became the highlight of my week. That’s why I keep coming back to them. They’re reliable, delicious, and surprisingly nourishing.
Why You’ll Love This Recipe
Quick & Easy Batch Prep
This recipe comes together in under fifteen minutes of active prep time, which is perfect for those busy weeknights when you’re already tired. You can mix everything in a single bowl and scoop it into the muffin tin before you know it. The baking time is straightforward, so you aren’t standing over the stove babysitting it. This makes it an ideal candidate for Sunday meal prep or a quick Saturday morning project.
Simple Ingredients
No fancy grocery trips are needed for this one. You likely already have rolled oats, pumpkin puree, and spices in your pantry. If you don’t have pumpkin, you can swap it for applesauce, but the pumpkin adds a wonderful earthy sweetness that pairs perfectly with cinnamon. The ingredient list is short, which means less shopping and less waste. It’s wholesome food made from things you recognize.
Perfect for Meal Prep
These are great for grabbing and going. Whether you’re rushing to work, heading to the gym, or just trying to get out the door on time, these cups are your best friend. They hold up well in the fridge for up to five days. You can eat them cold, at room temperature, or warmed up for thirty seconds in the microwave. They don’t get soggy or fall apart, which is a huge plus for portable breakfasts.
Crowd-Pleaser
Kids and adults alike usually love these. The pumpkin flavor is mild and comforting, not overpowering. They feel like a treat but are packed with fiber and nutrients. I’ve served these to picky eaters who usually refuse anything orange or brown, and they always ask for seconds. It’s rare to find a healthy breakfast that gets rave reviews from everyone at the table.
Unbelievably Delicious
The texture is what really sets these apart. They are soft in the middle with a slightly crisp edge, offering a nice contrast. The combination of oats and pumpkin creates a creamy, cake-like consistency without the heavy fats of traditional muffins. It’s comfort food reimagined—healthier and faster, but with that same soul-soothing satisfaction. Every bite feels warm and satisfying.
What Makes This Recipe Different
Many baked oatmeal recipes rely on too much sugar or too many binders. This version uses the natural sweetness of the pumpkin and a touch of maple syrup to keep it balanced. I tested several ratios to find the perfect moisture level. The result is a cup that isn’t dry or crumbly. It’s moist enough to be enjoyable but firm enough to be held. It’s my best version because it actually works every single time.
Emotional Connection
This recipe isn’t just good—it’s the kind that makes you close your eyes after the first bite. It reminds me of autumn mornings spent in a cozy kitchen. It’s perfect for impressing guests without the stress of baking individual pies. Turning a simple meal into something memorable is what cooking is all about. These cups bring a little bit of that warmth to your daily routine.
What Ingredients You Will Need
This recipe uses simple, wholesome ingredients to deliver bold flavor and satisfying texture without the fuss. The key is balancing the moisture from the pumpkin with the absorbency of the oats. You want a mix that is thick enough to hold its shape in the muffin tin but loose enough to bake evenly. Here is what you’ll need to get started.
For the Base
- Rolled Oats: 2 cups (Old-fashioned oats work best; avoid quick oats as they turn to mush). I recommend using certified gluten-free oats if you have sensitivities.
- Baking Powder: 1 teaspoon (This helps them rise slightly and stay fluffy).
- Baking Soda: 1/2 teaspoon (Helps with browning and texture).
- Salt: 1/4 teaspoon (Enhances the flavor of the pumpkin and spices).
For the Wet Mix
- Pumpkin Puree: 1 cup (Make sure it is pure pumpkin, not pie filling. Look for brands like Libby’s for consistent texture).
- Milk: 1 cup (Dairy milk, almond milk, or oat milk all work well. Use room temperature for better mixing).
- Eggs: 2 large eggs (Room temperature eggs bind the mixture better. They act as the glue for the oats).
- Maple Syrup: 1/4 cup (Use pure maple syrup for a natural sweetness. Honey works too, but maple pairs better with pumpkin).
- Vanilla Extract: 1 teaspoon (Adds depth and aroma. Don’t skip this!).
- Melted Coconut Oil: 2 tablespoons (Adds moisture and richness. You can substitute with melted butter if you prefer).
For the Flavor Profile
- Cinnamon: 1 1/2 teaspoons (Generous amount for that classic pumpkin spice feel).
- Ginger: 1/2 teaspoon (Ground ginger adds a nice zing. If you don’t have it, use more cinnamon).
- Nutmeg: 1/4 teaspoon (Freshly grated is best, but ground works fine).
- Cardamom: 1/4 teaspoon (Optional, but adds a sophisticated floral note).
Optional Mix-ins
- Chopped Walnuts or Pecans: 1/2 cup (Adds crunch and healthy fats).
- Dark Chocolate Chips: 1/4 cup (For a sweet treat variation).
- Chopped Apples: 1/2 cup (Adds extra moisture and freshness).
Equipment Needed
You don’t need much to make these, which is part of the appeal. A standard 12-cup muffin tin is all you really need. I prefer a non-stick metal tin because it conducts heat evenly. Glass tins can work, but they might take a few extra minutes to bake. If your muffin tin isn’t non-stick, you’ll want to use paper liners or grease it well with cooking spray.
A large mixing bowl is essential. I like a bowl with a pouring spout because it makes transferring the wet batter into the muffin cups easier. A silicone spatula is your best friend here. It helps scrape every bit of the mixture out of the bowl so you don’t waste any. You also need a measuring cup and spoons for accuracy.
For storage, an airtight container is necessary. I use glass containers because they don’t retain odors. If you’re freezing them, freezer-safe bags work well. I also recommend having a small microwave-safe plate ready for reheating. These tips ensure your baking goes smoothly and your cleanup is minimal.
Preparation Method
Prep the Pan
Preheat your oven to 350°F (175°C). This is crucial for getting the right texture. Line your muffin tin with paper liners or lightly grease the cups with coconut oil spray. If you don’t use liners, make sure to grease the sides well so they don’t stick. This step takes about two minutes.
Mix the Dry Ingredients
In your large mixing bowl, whisk together the rolled oats, baking powder, baking soda, salt, cinnamon, ginger, nutmeg, and cardamom. Make sure there are no clumps of baking powder left. This ensures even rising. It takes about one minute to get this well combined.
Combine the Wet Ingredients
In a separate medium bowl or a large measuring cup, whisk the eggs until they are smooth. Add the pumpkin puree, milk, maple syrup, melted coconut oil, and vanilla extract. Whisk everything together until the mixture is uniform and smooth. The pumpkin should be fully incorporated into the liquid. This takes about two minutes.
Combine Wet and Dry
Pour the wet mixture into the bowl with the dry ingredients. Stir gently with your silicone spatula until everything is moistened. Do not overmix. You want the oats to be coated, but you don’t want to create a dense batter. If you are adding nuts or chocolate chips, fold them in now. This step takes about three minutes.
Fill the Muffin Cups
Divide the batter evenly among the 12 muffin cups. Each cup should be about 3/4 full. Use the back of a spoon to smooth the tops if they look uneven. This ensures they bake uniformly. This step takes about two minutes.
Bake
Place the tin in the preheated oven. Bake for 20-25 minutes. The edges should be lightly golden, and a toothpick inserted into the center should come out clean or with just a few moist crumbs. Avoid overbaking, or they will become dry. This takes 20-25 minutes.
Cool and Store
Let the cups cool in the pan for 5 minutes. Then, transfer them to a wire rack to cool completely. This prevents them from steaming and becoming soggy at the bottom. Once cool, store them in an airtight container. This takes about 15 minutes.
Cooking Tips & Techniques
One common mistake is using quick oats instead of rolled oats. Quick oats absorb liquid too fast and turn into a paste. Always stick to old-fashioned rolled oats for the best texture. Another tip is to make sure your pumpkin puree is not watery. If your can seems runny, drain it slightly before adding it to the mix.
I once overfilled the cups and had batter spill over the edges. It burnt and stuck to the pan, making cleanup a nightmare. Now, I fill them only 3/4 full to be safe. Also, don’t skip the resting time after baking. Letting them cool in the pan helps them set. If you move them too soon, they might break.
Multitasking is key here. While the oats are mixing, you can preheat the oven. This saves time. Also, measure all your ingredients before you start mixing. This is called *mise en place*, and it makes the process much smoother. If you find the batter too thick, add a splash more milk. If it’s too thin, add a tablespoon more oats.
Consistency is important. If your muffin cups are uneven, some will bake faster than others. Use a cookie scoop to portion the batter evenly. This ensures uniform baking. I also recommend rotating the pan halfway through baking if your oven has hot spots. This promotes even browning.
Variations & Adaptations
You can easily adapt this recipe to fit your dietary needs. For a vegan version, replace the eggs with two flax eggs (2 tablespoons ground flaxseed mixed with 5 tablespoons water). Let it sit for five minutes to gel. Use plant-based milk and maple syrup instead of honey. The texture will be slightly denser but still delicious.
If you want to reduce sugar, cut the maple syrup in half. The pumpkin provides enough natural sweetness. You can also add unsweetened applesauce for extra moisture without added sugar. For a protein boost, stir in a scoop of vanilla protein powder. You may need to add a little more milk to compensate for the dryness.
Seasonal variations are fun. In the fall, add chopped pecans and a dash of cardamom. In winter, mix in cranberries and white chocolate chips. For spring, try adding lemon zest and blueberries. These changes keep the recipe interesting.
I once tried adding oat bran to make them more fibrous. It worked well, but I had to add a bit more liquid. The bran absorbs more moisture than regular oats. Another variation is to swap the pumpkin for sweet potato puree. It has a similar texture but a slightly different flavor profile. Both work beautifully.
Serving & Storage Suggestions
These cups are great served warm. Microwave them for 30-60 seconds for a fresh-out-of-the-oven feel. They are also delicious cold straight from the fridge. I like them with a dollop of Greek yogurt or a drizzle of almond butter. They pair well with black coffee or tea.
For storage, keep them in an airtight container in the refrigerator for up to five days. They maintain their moisture well. For longer storage, freeze them for up to three months. Place them in a single layer on a baking sheet to freeze, then transfer to a freezer bag. This prevents them from sticking together.
To reheat from frozen, microwave for 1-2 minutes or let them thaw in the fridge overnight. The flavors develop over time, so they often taste better on day two. The oats soften slightly, and the spices become more pronounced.
Presentation matters. Serve them on a simple plate with a sprig of mint or a dusting of cinnamon. They look rustic and inviting. You can also serve them as a dessert. They are light enough to follow a heavy meal.
Nutritional Information & Benefits
Each cup contains approximately 150-180 calories, depending on the size and mix-ins. They are a good source of complex carbohydrates from the oats, which provide sustained energy. The pumpkin adds vitamins A and C, which are great for immune health. The oats also contain beta-glucan, a fiber that supports heart health.
This recipe is naturally gluten-free if you use certified gluten-free oats. It is also dairy-free if you use plant-based milk and oil. For those watching sugar intake, the natural sweetness from pumpkin and maple syrup keeps it moderate.
The protein content comes from the eggs and oats. Adding nuts or protein powder can increase this. These cups are a balanced breakfast option. They help keep you full until lunch. I find they prevent mid-morning snacking.
Conclusion
These Healthy Pumpkin Baked Oatmeal Cups are a game-changer for busy mornings. They are easy to make, delicious to eat, and nutritious. I hope you try this recipe and find it as useful as I do. Feel free to customize it with your favorite mix-ins.
Please leave a comment below and let me know how you liked them. Share your variations or photos on social media. I love seeing how you adapt this recipe. It’s always inspiring to see what you create.
Enjoy your baking, and have a wonderful week ahead. These cups are a small treat that makes a big difference.
Frequently Asked Questions
Can I use quick oats instead of rolled oats?
No, quick oats will make the cups mushy. Stick to old-fashioned rolled oats for the right texture.
How do I store leftover oatmeal cups?
Store them in an airtight container in the fridge for up to five days. You can also freeze them for up to three months.
Can I make these vegan?
Yes, replace the eggs with flax eggs and use plant-based milk and oil.
What can I substitute for pumpkin puree?
You can use unsweetened applesauce or mashed sweet potato. The texture will be slightly different but still good.
How do I reheat them?
Microwave for 30-60 seconds. They can also be eaten cold from the fridge.